
GoHighLevel has no Yoast, no RankMath, and no plugin that quietly fixes your mistakes. Here is exactly how SEO works inside GHL in 2026, field by field, so a beginner can set a page up correctly the first time.

This is part one of a five part series on SEO inside GoHighLevel. Part one is the foundation: how the CMS actually works, where every SEO field lives, and the manual habits you need because nothing in GHL is going to nag you into doing it right.
I want to be upfront about something. GoHighLevel was not built to be a content platform. It was built to convert. That is not a criticism, it is the whole point of the product. But it does mean that if you come from WordPress, you are about to lose the safety net you did not know you were leaning on. Nothing here is hard. It is just manual, and manual work only happens if you build the habit.
By the end of this piece you will be able to open any page, funnel step, or blog post in GoHighLevel and set it up properly in about four minutes, without guessing.
1. Understanding the GoHighLevel CMS architecture
Why there is no Yoast, and why that matters more than people think
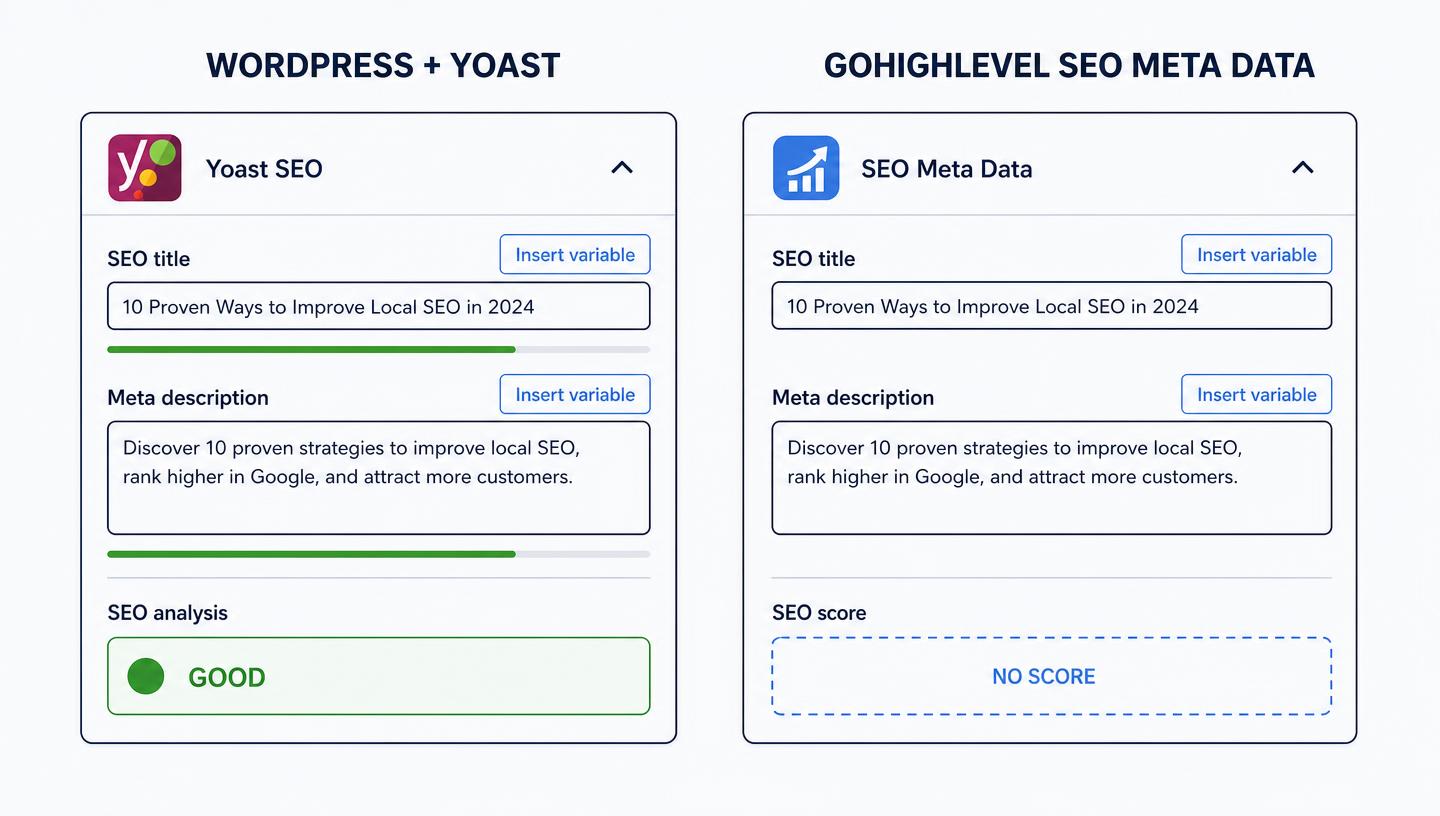
In WordPress, plugins like Yoast and RankMath do three jobs. They give you input fields for metadata, they write that metadata into the page head for you, and they grade your work with a traffic light so you notice when something is missing.
GoHighLevel gives you the first two. It does not give you the third.
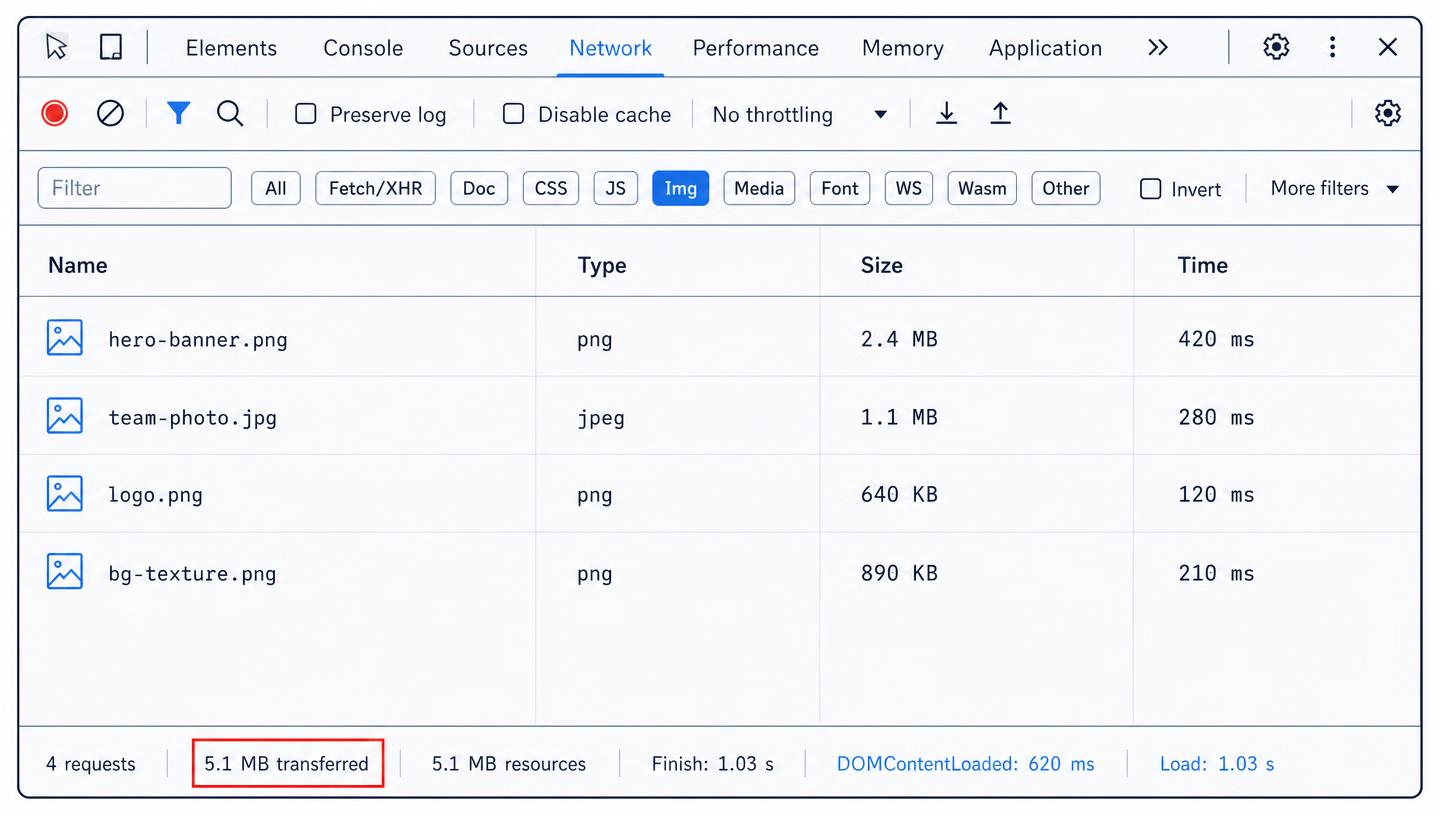
That missing traffic light is the entire reason most GHL sites underperform in search. There is no red dot telling you the meta description is blank. There is no warning that you have three H1 tags because you styled three section headers the same way. There is no alert that your hero image is a 2.4 MB PNG. The page looks beautiful, it converts fine from paid traffic, and it is functionally invisible to Google.
So the mental model to adopt is this: in GoHighLevel, SEO is a checklist you run, not a score you chase. Once the checklist is a habit, GHL is genuinely fine as an SEO platform. Plenty of pages built in it rank. But the discipline has to come from you.
Websites versus Funnels: the same fields, different rules
GoHighLevel has two builders that look almost identical and behave very differently for search.
| Websites | Funnels | |
|---|---|---|
| Built for | Content, browsing, discovery | One path, one action |
| Navigation | Full menus, internal linking | Usually stripped, often no nav |
| Typical page count | Many | Two to five steps |
| Indexing intent | Index everything useful | Index the entry step only |
| Best SEO use | Service pages, location pages, blog | Paid traffic and email landing pages |
The practical rule I follow: if a page is meant to earn a click from Google, build it in Websites. If a page is meant to catch a click you already paid for, build it in Funnels.
The reason is not that funnels are penalised. They are not. It is that funnel steps two, three and four are thank you pages, upsells, and confirmations. Those pages have thin content, no internal links, and no reason to exist in an index. If you leave them crawlable, you dilute the site with low value URLs and you occasionally get the wrong step ranking for your brand name, which is a genuinely bad experience for the searcher.
Funnels also inherit a structural problem: they typically have no navigation. Internal linking is one of the strongest signals you control, and a nav-less page sits alone with nothing linking into it. A funnel entry step can absolutely rank, but it needs links pointed at it from somewhere.
There is one more difference worth knowing. Website pages in GHL support a proper page hierarchy in the URL structure, so you can build /services/roof-repair/ style paths. Funnels live under the funnel path. If your keyword strategy depends on a tidy folder structure, that alone decides the builder for you.
The 2026 GoHighLevel SEO stack
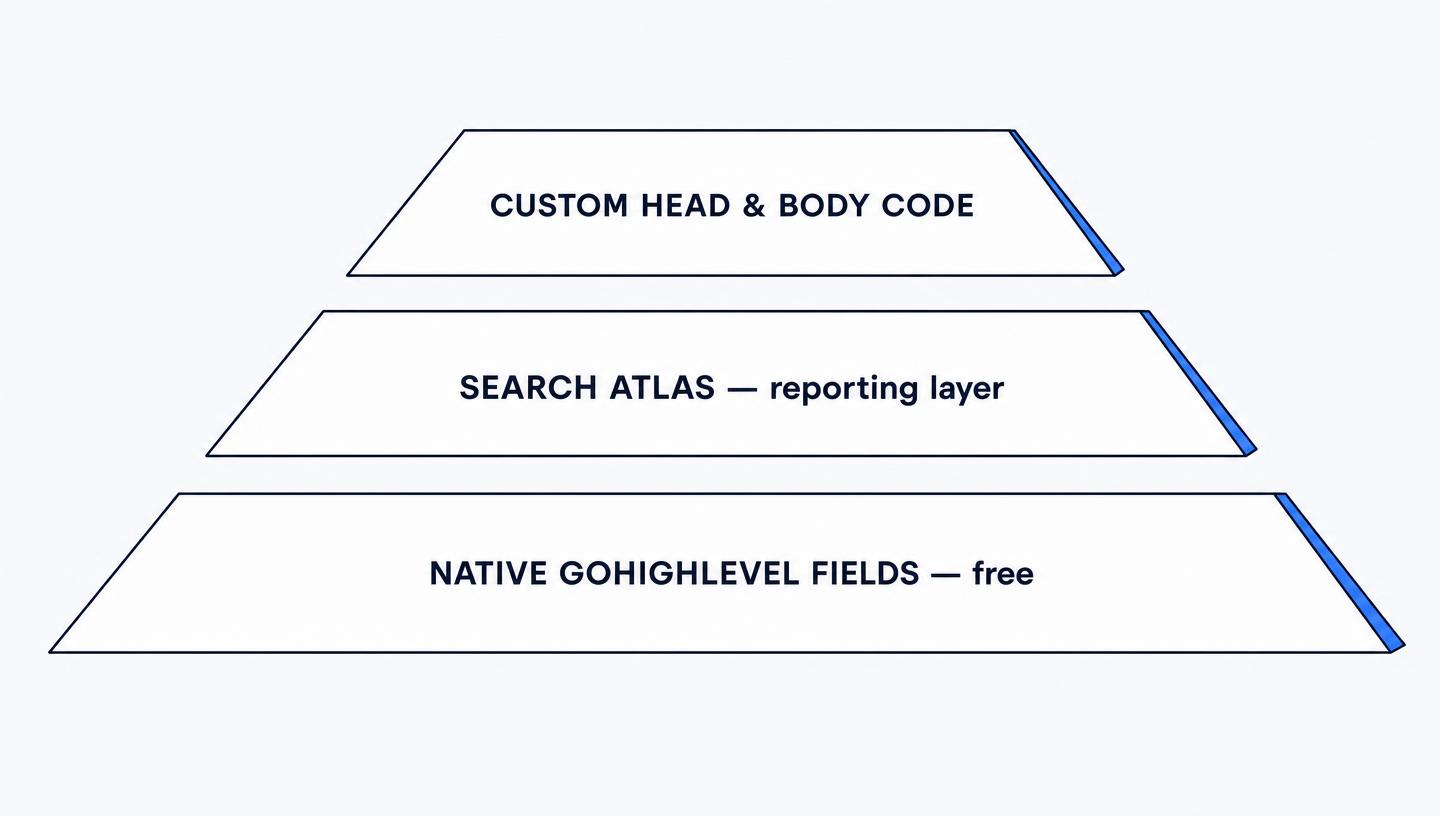
As of 2026 there are three layers to what you can do inside GHL, and it helps to know which layer a given feature lives in, because they are priced and supported differently.
Layer one, native and free. Meta title, meta description, social preview image, custom meta tags, URL slug, alt text in the media library, the blog engine, sitemap generation, and robots handling. Everything in this article lives here. This layer is enough to rank a local business.
Layer two, the integrated Search Atlas engine. GoHighLevel ships an SEO tool built on Search Atlas that handles keyword research, site auditing, on-page grading, and content generation from inside the CRM. It is a paid add-on at the agency level. It is useful, and it does restore something like the traffic light you lost. But it grades pages, it does not fix them. Every fix it recommends still gets applied by hand in the fields below. Treat it as a reporting layer on top of the fundamentals, not a replacement for them.
Layer three, custom code. GHL lets you inject custom code into the head and body at both the funnel/site level and the individual page level. That is where advanced schema, third party analytics, and technical patches go. We cover that properly in part five of this series.
One honest limitation to know before you build
GoHighLevel renders pages client side in a way that is heavier than a lean static site. Google renders JavaScript, so this is not fatal, and I have watched plenty of GHL pages rank on page one. But it does mean speed is not free the way it is on a well built static site. You have less headroom, so the image and structure discipline in sections three and four matter more here than they would elsewhere. Part five of this series is entirely about clawing that speed back.
2. Mastering page level SEO metadata
This is the highest leverage four minutes you will spend on any page.
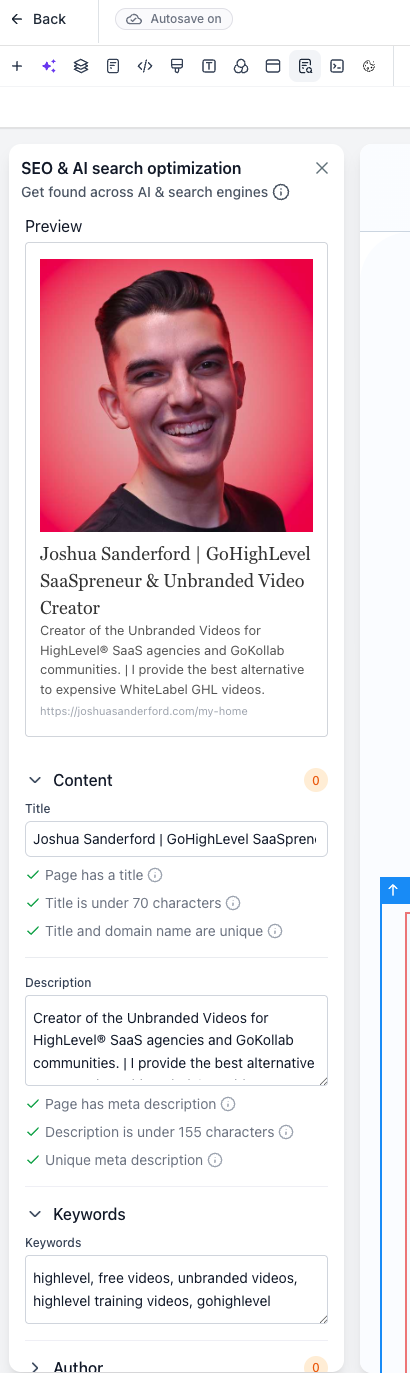
UI path: Sites > Websites (or Funnels) > select your site > Pages > hover the page > Settings > SEO Meta Data
That panel gives you the title, the description, the social preview image, the author field, and a custom meta tag area. Let us take them one at a time.
Meta title tag strategy
The title tag is still the single strongest on-page signal you control, and in GHL it is a blank box that will happily stay blank forever.
Length. Aim for 50 to 60 characters. Google truncates on pixel width rather than character count, so a title full of capitals and wide letters clips earlier than one in lowercase. Fifty five characters is a safe working target.
Keyword position. Put the primary phrase as close to the front as you can while still reading like a human wrote it. Emergency Roof Repair in Fort Worth | Acme Roofing beats Acme Roofing - Your Trusted Local Partner for All Roofing Needs.
Brand formatting. Use a consistent separator sitewide, either a pipe or a hyphen, and put the brand at the end. The exception is your homepage, where leading with the brand is fine because brand is the query people use to find it.
Every page gets a unique one. The most common GHL mistake I see on audits is a site where nine pages share the business name as the title because nobody filled the field in and GHL fell back to the page name.
Useful patterns to steal:
- Service page:
{Service} in {City} | {Brand} - Location page:
{Brand} {City} | {Primary Service} - Comparison post:
{Tool A} vs {Tool B}: {Angle} ({Year}) - Guide:
How to {Outcome} in {Timeframe} | {Brand}
Meta description optimisation
The description is not a ranking factor. It is a click through rate factor, which affects how much traffic a given ranking actually delivers, so it earns its place in the checklist.
Length. 150 to 160 characters. Under 120 and you are giving away free space. Over 160 and Google clips you mid sentence, which reads as sloppy in the results page.
Write it as ad copy. You have one sentence of promise and one sentence of proof or push. Include the keyword once, naturally, because Google bolds matched terms and bold text pulls the eye.
Click through triggers that actually work: a concrete number, a named location, a specific timeframe, a stated price or price range, and a plain instruction like "book online in two minutes".
What to avoid: leaving it blank, which lets Google scrape whatever text it finds first, often your nav labels or a cookie notice. Also avoid reusing one description sitewide, which is the fastest way to make ten pages look like one page.
Social preview and Open Graph images
The social image field in GHL sets what appears when the URL is pasted into Facebook, LinkedIn, iMessage, Slack, or a text message. On a local business site, texted links are a real traffic channel, and a broken preview costs you clicks silently.
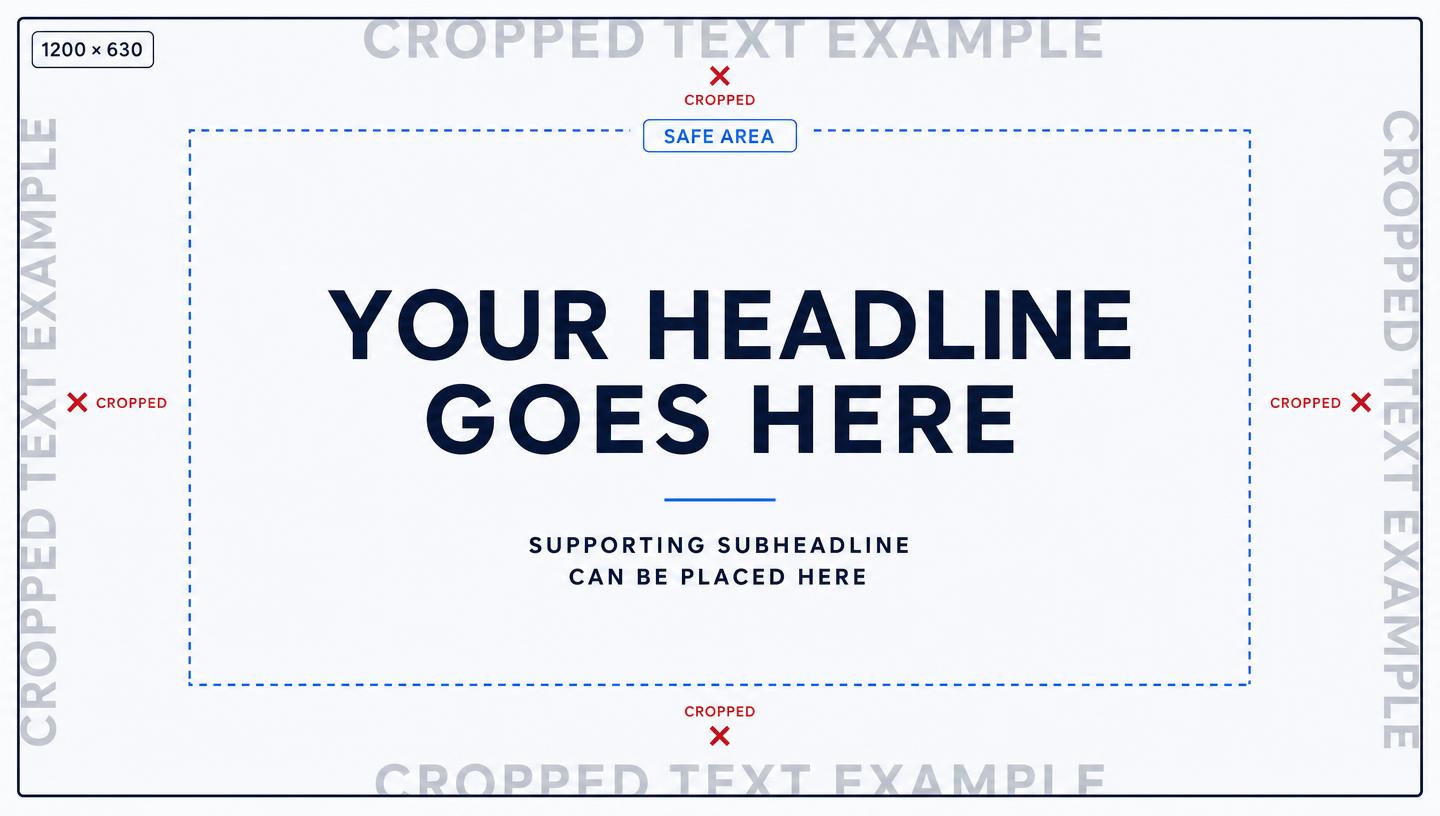
Dimensions: 1200 x 630 px, a 1.91:1 ratio. That is the size every major platform crops toward.
Safe area: keep text and logos inside the middle 80 percent. Some surfaces crop to a square or to 1200 x 600, and edge-aligned text loses its head.
File size: under 200 KB. Use JPG for photographic images, PNG only when you need transparency, WebP where the platform accepts it.
Text size: whatever you think is big enough, go bigger. That image renders at roughly 300 px wide in a phone message preview.
One image per page type, minimum. A single generic company card across the whole site is acceptable but leaves value on the table. Distinct cards for your main service pages and your best blog posts are worth the hour.
Author and custom meta tags
The author field feeds your byline and supports the experience and expertise side of how Google evaluates content. Fill it with a real person's name, not the company name, on anything editorial.
The custom meta tag area is where the rest goes. Practical uses:
robotsset tonoindex, nofollowon thank you pages, confirmation steps, and internal use pages. This is the single most useful custom tag in GHL.canonicalwhen the same content is reachable at more than one URL, which happens more than you would expect once a site has funnels and website pages covering similar ground.- Verification tags for Search Console, Bing Webmaster Tools, and Pinterest, if you did not verify by DNS.
One thing not to bother with: meta keywords. Google has ignored it since 2009. The field exists in various tools out of habit. Filling it in does nothing, and stuffing it in view of a competitor doing a manual audit just hands them your keyword list.
Useful tools for this section:
- Google Search Console - the only source of truth for what your titles and descriptions actually get clicked
- Facebook Sharing Debugger - forces a re-scrape after you change a social image
- LinkedIn Post Inspector - same job, for LinkedIn
- Squoosh - free browser based image compression, no upload to a third party server
3. On-page structure and heading hierarchy
Heading tags are how a crawler builds an outline of your page. In a drag and drop builder, they are also how you make text big, which is where everything falls apart.
The rule that breaks most GHL pages
In the GHL editor, when you drop a heading element it defaults to a heading tag, and when you make it bigger you often reach for a larger heading level. Do that four times down a long page and you have four H1 tags, because H1 is the biggest one in the dropdown.
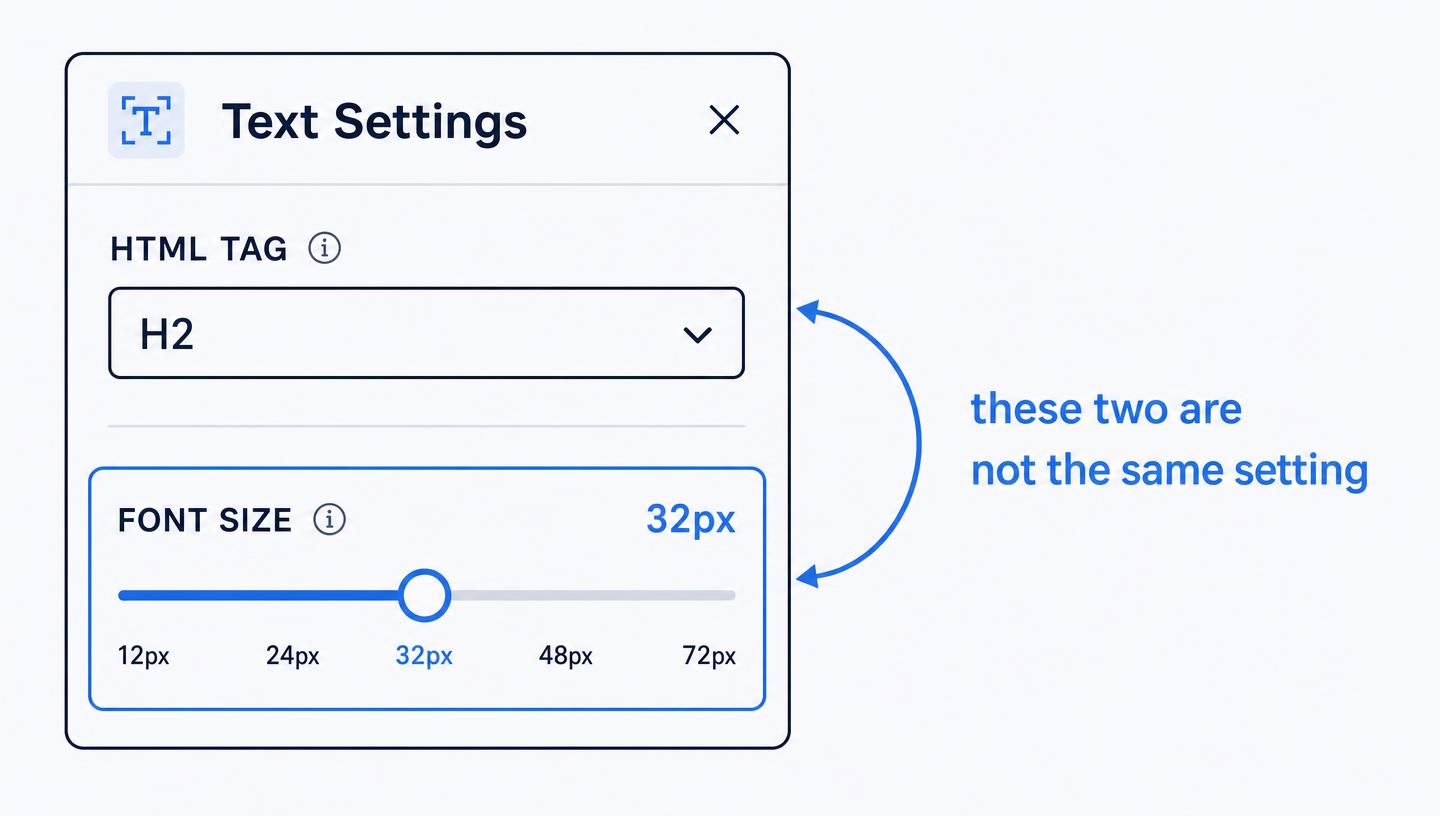
Size is a style decision. Heading level is a structure decision. They are set in two different places, and you should treat them as unrelated.
In the element settings, the heading level lives in the text or typography settings as an HTML tag selector. The visual size lives in the style panel as a font size. Set the tag by meaning, then set the size by design. If your H2 needs to look enormous, make it enormous. It stays an H2.
H1 discipline
One H1 per page. Not zero, not two.
The H1 should contain your primary keyword and should broadly match the promise of the title tag without being a copy paste of it. On a long GHL sales page, the H1 is almost always the hero headline.
Common places a second H1 sneaks in:
1. A section header styled for impact. 2. A logo element set as a heading rather than an image. 3. A pop-up or modal built inside the page with its own heading. 4. The mobile duplicate. This one is worth its own section.
The mobile and desktop duplicate problem
GHL lets you hide elements per device. A very common build pattern is a desktop hero and a separate mobile hero, with each hidden on the other viewport.
The catch: hidden on mobile does not mean absent from the HTML. The element is still in the source, and the crawler still reads it. Two heroes means two H1s, duplicated headline copy, and a slightly confused outline, even though a human only ever sees one.
How to handle it:
- Where you can, build one responsive element instead of two device-specific ones. Adjust font size and padding per device rather than duplicating the block.
- Where you genuinely need two, make the hidden one an H2 or a plain paragraph styled to look like a heading. Only the visible-on-desktop version keeps the H1.
- Audit it by viewing the rendered source rather than trusting the editor.
H2 to H4 cascading
Think of it as a document outline, because that is exactly what it is.
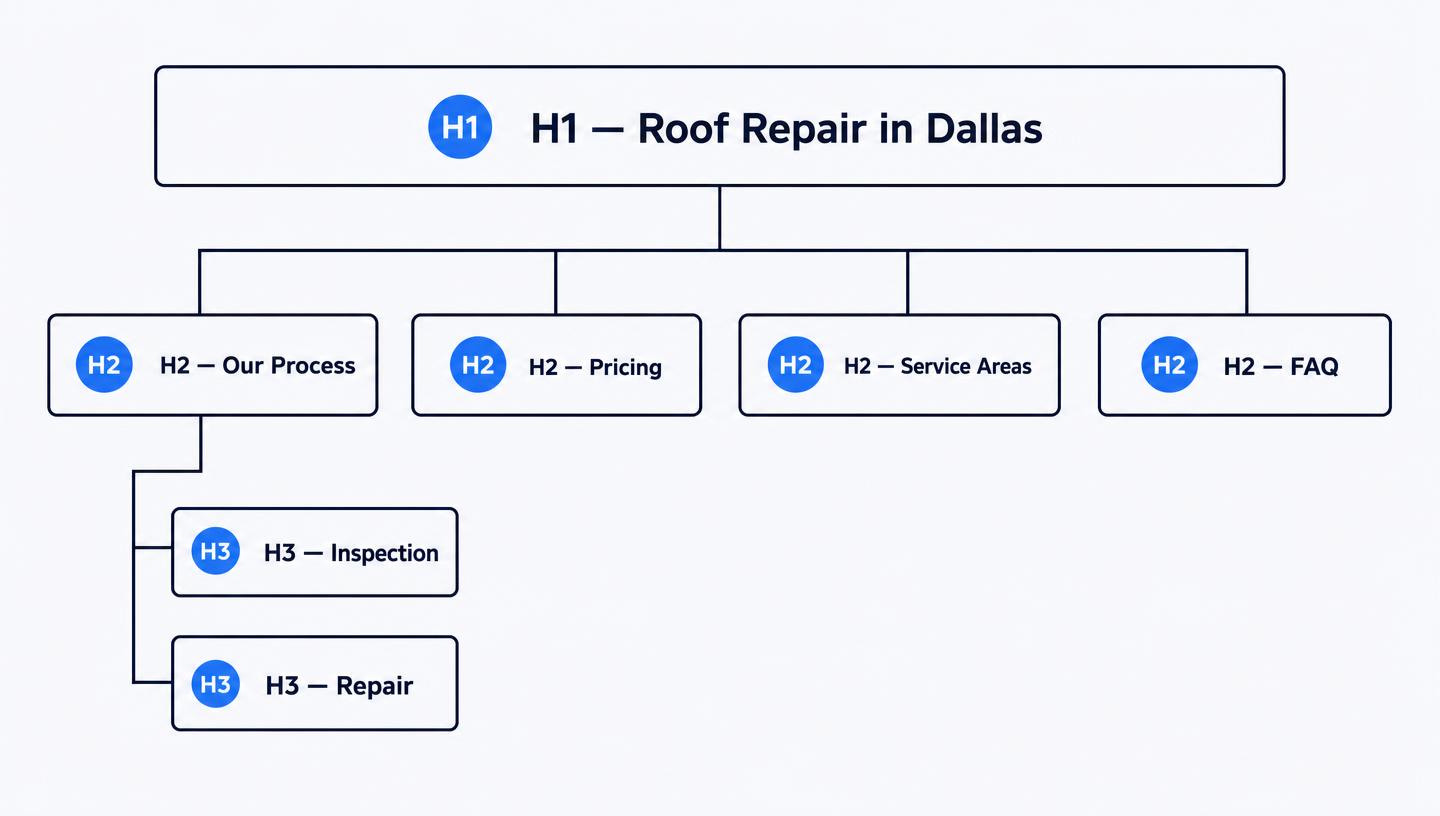
- H1 - the page promise, once.
- H2 - major sections. On a service page, these are the things a buyer needs to know: what it is, what it costs, how it works, who you are, what people say.
- H3 - subdivisions inside an H2.
- H4 - rare. If you need it often, your page probably wants to be two pages.
Do not skip levels going down. An H2 followed by an H4 is a gap in the outline. Going back up is fine.
Where this pays off beyond ranking: clean heading structure is what lets Google pull a jump-to section link in the results, and it is what makes your page readable by screen readers. It is also what AI search tools parse when they decide which chunk of your page answers a question.
Tools to verify your structure:
- Detailed SEO Extension - free Chrome extension, shows the full heading outline of any page in one click
- W3C Markup Validation Service - catches structural HTML problems
- Chrome DevTools, right click and Inspect, or Ctrl/Cmd + U to view source
4. Image SEO and media library practice
Images are where GoHighLevel sites lose the most speed, and speed is a ranking input. This section is the highest return work in the whole article.
Compress before you upload, always
GHL does some optimisation on delivery, but it will not save you from a 4 MB camera export.
The rules I use:
- Hero and full width images: under 200 KB.
- Inline content images: under 100 KB.
- Icons and logos: under 30 KB, SVG where possible.
- Format: WebP as the default. JPG for photos when WebP is not an option. PNG only for transparency. Never a PNG screenshot of a photograph.
- Dimensions: resize to the largest size the image is ever displayed at, then stop. A hero that renders at 1600 px wide does not need a 4000 px file.
A useful sanity check: open your page, load DevTools, go to the Network tab, filter to Img, and reload. If the total is over about 1.5 MB, you have work to do. Most unoptimised GHL pages come in between 4 and 12 MB, and the fix is usually three images.
Alt text
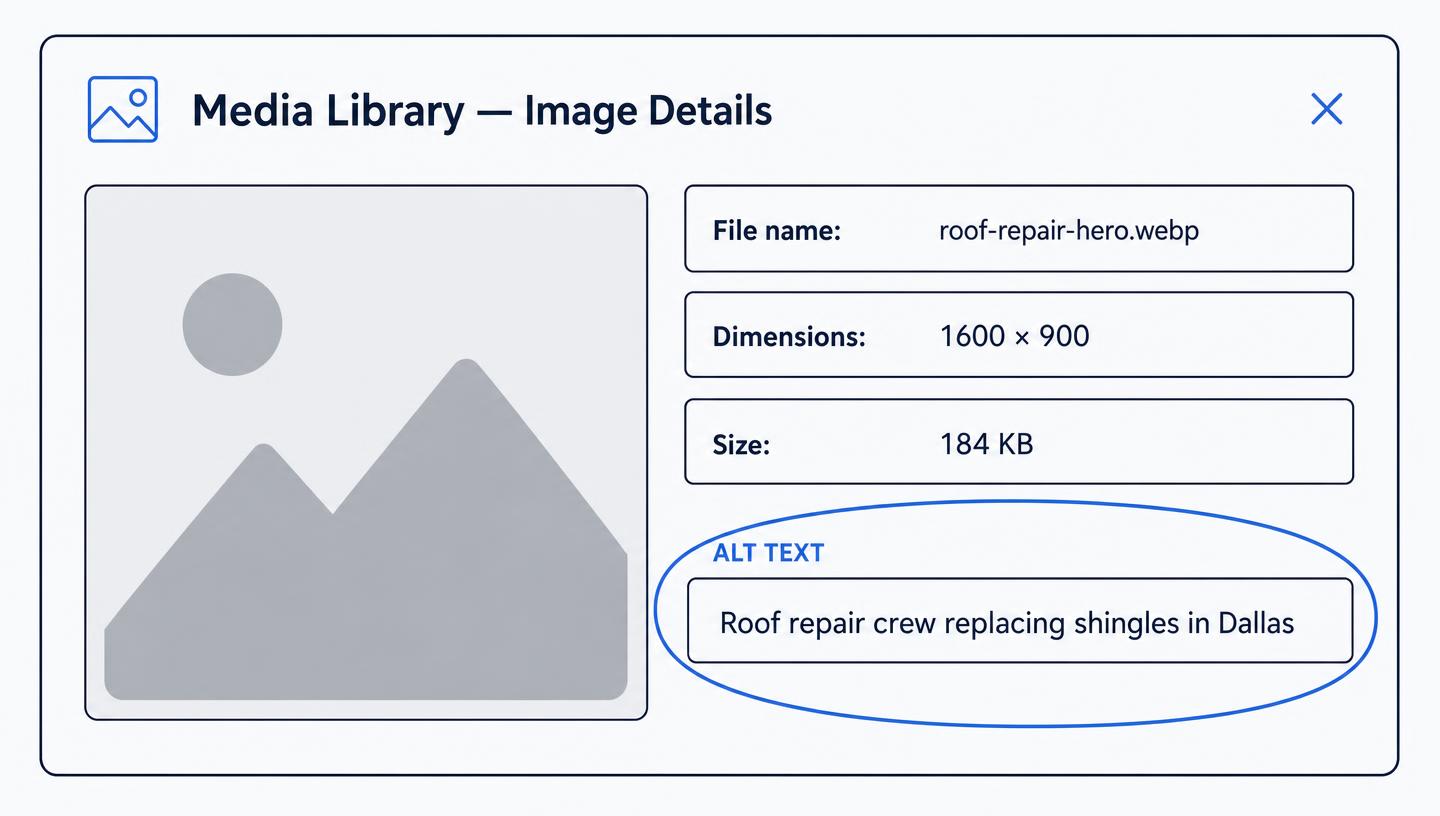
UI path: Media Library > click the image > Image Details > Alt Text. You can also set it per element inside the page editor, and the element level value wins.
Good alt text describes the image to somebody who cannot see it. That is the whole test. If the description happens to contain your keyword because the image is genuinely of that thing, excellent. If it does not, do not force it.
- Weak:
image1 - Weak:
roofing roofer roof repair fort worth roofing company - Good:
Crew replacing storm damaged shingles on a two storey home in Fort Worth
Decorative images, dividers, background textures, and spacer graphics should have empty alt text so screen readers skip them rather than reading out noise.
Background images versus inline images
This distinction matters and almost nobody knows it.
An inline image is an actual image element in the HTML. It can carry alt text, it can be indexed by Google Images, and it is visible to crawlers as content.
A background image is applied in CSS to a section or row. It cannot carry alt text and is effectively invisible to image search.
So: use section backgrounds for atmosphere, texture, and hero washes. Use inline image elements for anything that is actually content, such as product photos, before and after shots, team photos, screenshots, and diagrams. If an image would be worth finding in Google Images, it must be an inline element.
One more note: if a background image carries important text, that text does not exist as far as a crawler is concerned. Real text over an image beats text baked into an image every time.
Tools for this section:
- Squoosh - compress and convert to WebP in the browser
- TinyPNG - batch compression, handles PNG and JPG
- PageSpeed Insights - tells you which specific images are costing you
- Google Search Console Core Web Vitals report - shows real world load performance over time
5. URL paths and slug discipline
Slugs are permanent in practice. Changing one later means a redirect, and a missed redirect means a dead link. Get them right at creation.
Setting the slug
UI path: Sites > Websites > Pages > hover the page > Settings > Page Details, where you will find the URL path field. In funnels it is set per step in the step settings.
What a good slug looks like:
- Lowercase, hyphen separated, no underscores, no spaces.
- Three to five words. Shorter is better.
- Includes the primary keyword, drops the filler words.
- No dates, no numbers unless the number is part of the topic.
- No stop words that add nothing:
the,and,for,a.
Examples:
| Bad | Good |
|---|---|
/Our-Services-Page-V2 | /roof-repair |
/new-landing-page-step-1 | /free-roof-inspection |
/services?id=44 | /services/gutter-cleaning |
/blog/post-2026-03-14-final-final | /blog/roof-repair-cost-fort-worth |
Preventing the auto-generated mess
When you duplicate a page or a funnel step, GHL appends something. You get -v2, -copy, -step-1, or a trailing number. It is harmless in the editor and embarrassing in a search result.
Build the habit: every time you duplicate a page, the very next action is to open settings and fix the slug. Before you touch the design. Every time.
Do a sweep of your existing site now. Open the pages list, read down the URL column, and fix anything with a -v2, a copy, or a step number. If a bad URL is already indexed or already linked from somewhere, set up a redirect from old to new rather than just changing it. GoHighLevel handles redirects under Sites > URL Redirects, and you want a 301, which is the permanent type.
Subdomain versus apex domain routing
How you attach the domain shapes your URL structure, and it is very annoying to change later.
Apex domain (yourbusiness.com) is the default and correct choice for the main site. All authority accumulates in one place.
Subdomain (go.yourbusiness.com, booking.yourbusiness.com) is treated by search engines as a related but separate property. Authority does not flow between a subdomain and the apex as freely as it does between folders on the same domain.
The practical setup for most GHL agencies and local businesses:
- Main website, service pages, and blog on the apex domain.
- Funnels, booking flows, and campaign landing pages on a subdomain, or on a path under the main domain if you want them to inherit authority.
- Client portals, membership areas, and anything logged in on a subdomain, set to noindex.
In GoHighLevel you connect domains under Settings > Domains, then map each website or funnel to a domain and path. Decide the whole map before you build. Rearranging live URLs is the subject of part three of this series, and it is not a fun afternoon.
6. The native GoHighLevel blogging engine
UI path: Sites > Blogs
The GHL blog is deliberately simple. It is not WordPress and it will not pretend to be. What it does give you is a content area on your own domain, which is what actually matters, and enough SEO control to compete.
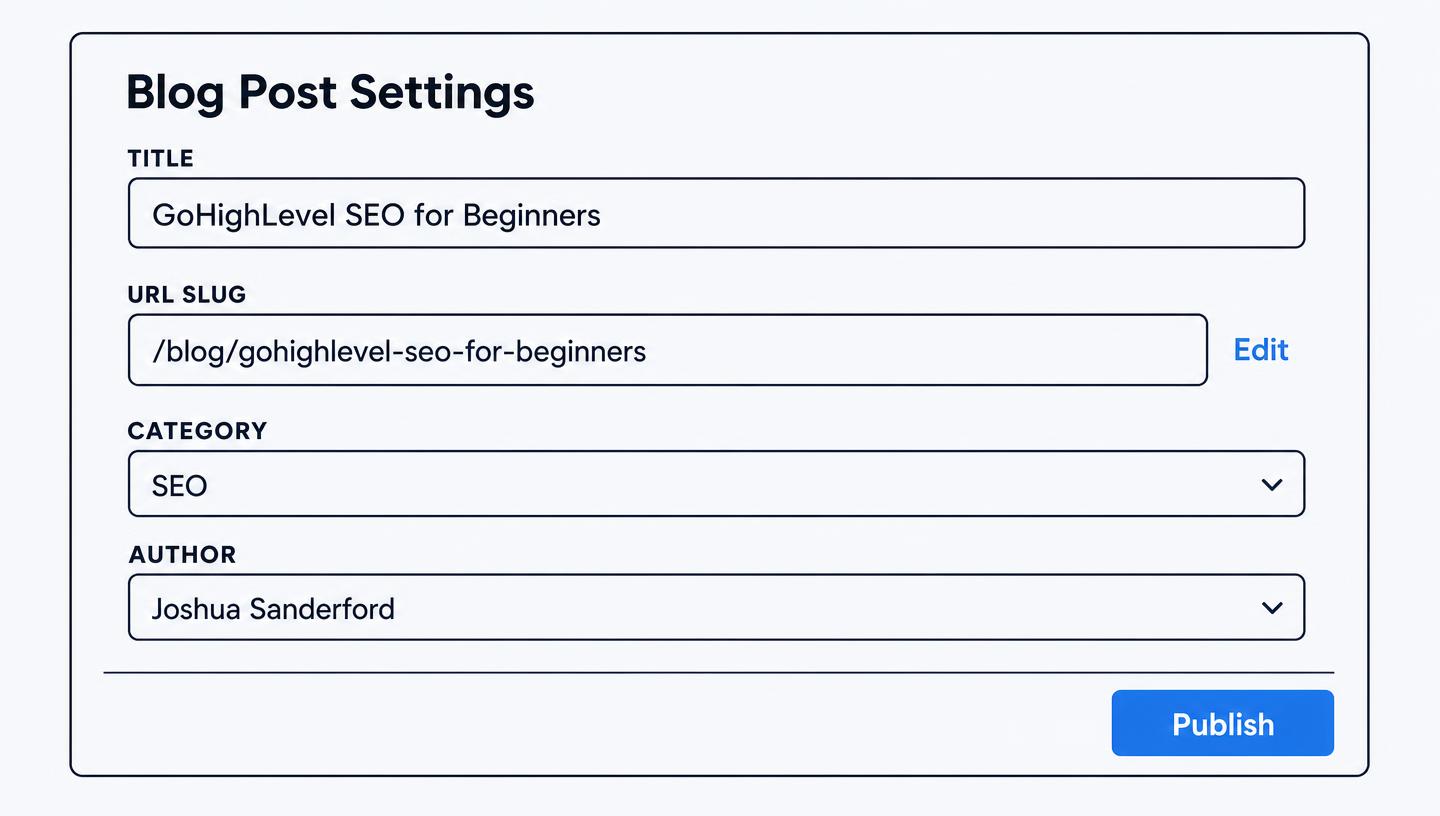
Post title versus URL slug
They are separate fields, and they should be.
The post title is written for a human scanning a list of results. It can be long, it can have a colon, it can carry a hook.
The URL slug is written for clarity and permanence. Strip it to the topic.
Title: Why It Is Not Too Late: A Cost Analysis of GoHighLevel vs Its Competitors Slug: /blog/gohighlevel-vs-competitors-cost
Set the slug when you create the post. GHL will generate one from the title if you do not, and a title-derived slug on a long headline gives you an eighty character URL that nobody will ever paste anywhere.
Then set the SEO title separately. GHL gives blog posts their own meta title and description fields, exactly like pages. The post title and the meta title do not have to match, and on a long headline they should not, because the meta title needs to fit in 60 characters.
Categories and author profiles
Categories create archive pages, and archive pages are real URLs that can rank or can bloat your index. Rules I stick to:
- Five to eight categories maximum for a normal business blog.
- Name them after things people search for, not internal departments.
- One primary category per post.
- Do not create a category until you have three posts that belong in it.
Author profiles carry a name, a photo, and a bio. Fill them in properly with a real person. Search engines increasingly weigh who wrote something and whether that person demonstrably knows the subject. A named author with a specific, credentialed bio beats "Admin" every time. Link the author bio out to the same person's profiles elsewhere so the identity connects up.
RSS and indexing
The GHL blog produces an RSS feed. Two things worth doing with it:
1. Point your email platform at it if you want automated round-up sends. 2. Submit it as a secondary sitemap in Search Console. It helps new posts get discovered faster than waiting on a crawl.
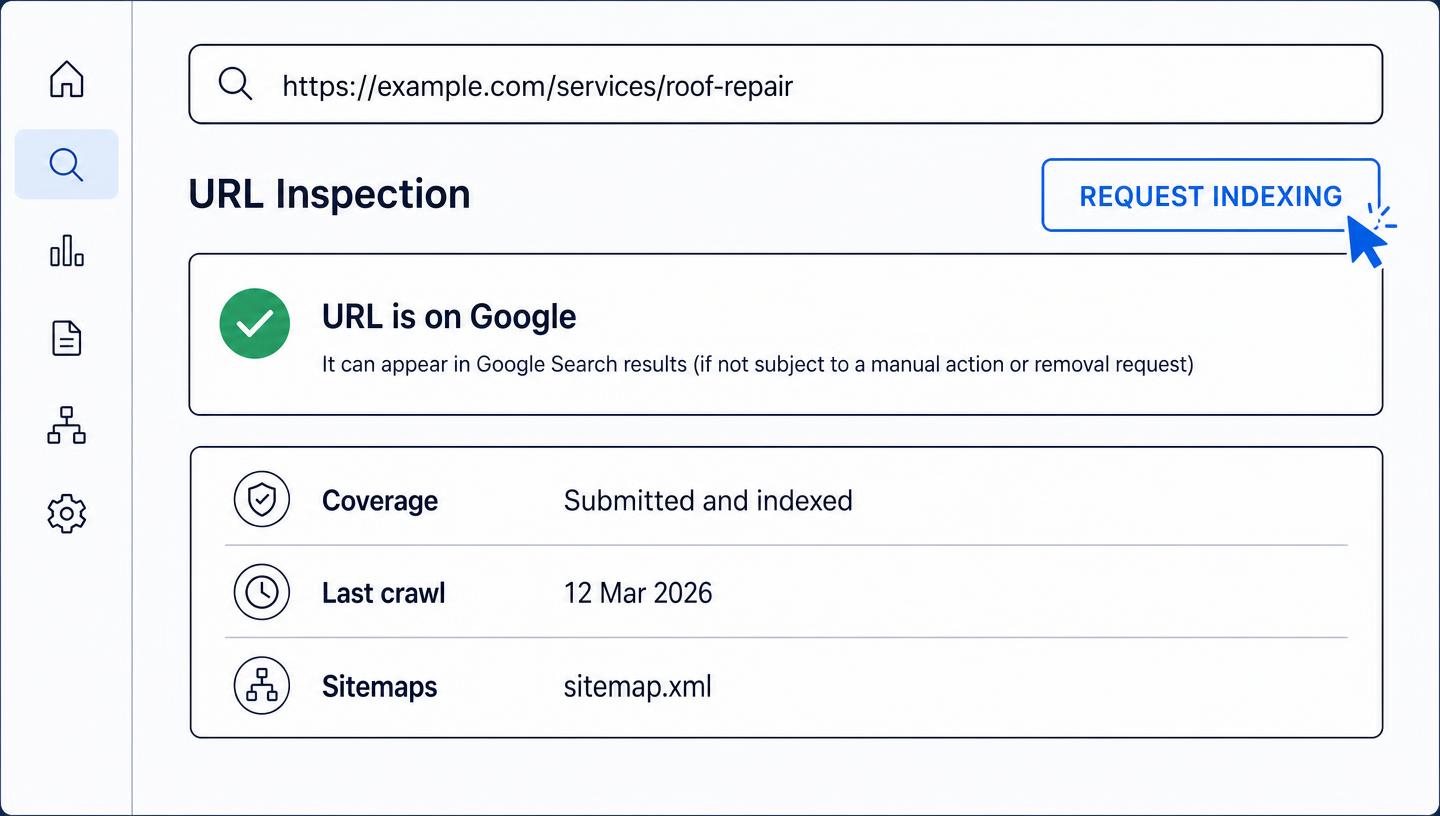
For indexing generally: after publishing, open Search Console, paste the URL into the inspection bar, and click Request Indexing. It is not a guarantee and it is not a ranking boost, but it moves the URL into the crawl queue instead of leaving it to be found. On a site with little authority, that is the difference between an hour and a fortnight.
Also confirm your sitemap is submitted. GHL generates one for each site. Find it at yourdomain.com/sitemap.xml, verify the URLs listed are the ones you want indexed, and submit the sitemap URL in Search Console once. Check it again after any structural change.
Tools for this section:
- Google Search Console - indexing requests, sitemap submission, performance data
- Bing Webmaster Tools - free, five minutes to set up, and it feeds several AI search tools
- Schema.org Article documentation - reference for the markup covered in part five
The four minute page checklist
Print this. Run it on every page before you publish.
1. Meta title written, unique, 50 to 60 characters, keyword near the front. 2. Meta description written, 150 to 160 characters, one clear reason to click. 3. Social preview image set, 1200 x 630, under 200 KB, text inside the safe area. 4. Exactly one H1 on the page, including anything hidden on mobile or desktop. 5. Headings cascade H1 to H2 to H3 with no skipped levels. 6. Every content image compressed under 200 KB and converted to WebP. 7. Every content image has real, descriptive alt text. Decorative images have empty alt text. 8. URL slug is clean, lowercase, hyphenated, and free of -v2, copy, and step numbers. 9. Thank you pages, confirmations, and internal pages carry a noindex custom meta tag. 10. Page submitted for indexing in Search Console, and the sitemap is current.
That is it. Nothing on that list is difficult. All of it gets skipped when there is no plugin reminding you, which is precisely why doing it consistently is a real advantage in a market full of GHL sites where nobody bothered.
What is coming in this series
Part 2 - SEO for new websites on GoHighLevel: launch strategy and early authority. What to do in the first ninety days when you have no domain history and nobody linking to you.
Part 3 - Migrating a website to GoHighLevel? Nine critical SEO mistakes to avoid. Redirect mapping, preserving rankings, and the specific things that go wrong when a WordPress site becomes a GHL site.
Part 4 - Local SEO and multi-location dominance in GoHighLevel. Google Business Profile, ranking heatmaps, review automation, and running location pages at scale.
Part 5 - Advanced technical SEO, dynamic schema and speed optimisation in GoHighLevel. Custom head code, structured data, and getting Core Web Vitals into the green on a platform that does not make it easy.
If you have a specific GHL SEO question you want covered in one of those, email me at josh@egrowthlab.com and I will work it in.
GoHighLevel can generate and pre-render page titles, descriptions, and social tags with AI Studio, and score every page with the Search Atlas plugin. See the time it saves a business owner and the revenue it adds for an agency.
See GoHighLevel's SEO toolsJoin the free Jumpstart community and grab the extended GHL trial.
The full unbranded video library - 62 videos in one GHL install, plus the Jumpstart community.
Request your invite to my private GoHighLevel community
Over 1,700 agencies, beginners, and business owners sharing what actually works in GoHighLevel. Drop your email and I'll send your invite.