Three Setups at Three Price Points for a Three Camera Podcast/Conversation Style Podcasts or conversation style content in the market have t wo recognizable traits that cause the viewer to…
Three Setups at Three Price Points for a Three Camera Podcast/Conversation Style
Podcasts or conversation style content in the market have two recognizable traits that cause the viewer to stop and say, “oh, that’s a podcast or interview”…..and video isn’t either one of them.
Trait #1: Very clear audio
The industry standard podcast mic is the Shure SM7B a mic known for rich low ends, very high quality build, low noise, and an iconic shape. This is a $450, microphone you can sometimes find for $380 used. The issue with a mic like the SM7B is the costs surrounding the mic to actually use it, it needs a strong pre-amp like this one high quality XLR cables and an audio interface. This doesn’t even include mic stands, arms, or a micro-sd card to store the audio! A full fledged SM7B setup for a two person podcast/conversation setup will run just under $2,000 (buying a mixed of new and used gear), $1,300 if you find deals on everything.
The industry $$ hack options in my opinion, are plenty. Thankfully you don’t have to sacrifice very much to get an audio setup that still says, “I know what I’m doing here” and gives the audience an enjoyable listening experience. The mic is only $89, it’s the Rode PodMic…an incredible dynamic microphone with XLR which even has 2 packs available like this one for $178. If you are recording at a desk you can grab two of these for $40 each grab the XLR cable from the previous list (don’t cheap out on cables, they will last you a lifetime, and the cheaper options don’t have as good shielding from the environment which can introduce noises and distortion into your audio. Stick with the same audio recorder and if you are not recording at a desk, use some of these lightweight and portable mic stands that will allow you to set up a couch, outside, or anywhere you need. Last but not least, pick up a micro SD card to record your audio. All in, this setup will run you about $560, a HUGE price savings compared to the other option. Honestly, if you just want to get started with this type of content, invest in this setup + lighting, and start with your iPhone or Android phone for the video to get in a few great reps.
Trait #2: Thoughtful Lighting
Ever watched a piece of content and thought, “that is the most beautiful video I’ve ever seen!” 8 times out of 10, it could have been shot on an iPhone, or a camera 10x less expensive than the one used. It’s all because of the lighting/composition. Great lighting allows the viewer to focus on what matters, and shouldn’t draw too much attention to itself. Terribly lit videos are PAINFULLY obvious and have you scrolling to the next short in seconds even if the content was good.
Sunlight mastery is the great hack for lighting, shooting in the morning, or evening when the sun isn’t too bright, and you get variations in the color is the perfect setup, pair that with white see through shades on the windows and you get a beautifully lit soft setup. You can even bring in some practical lights like a lamp for the background to introduce depth to the scene and intrigue. The drawback? You can’t always or easily control the sun, clouds come and go, and your frame is left in the dark. Your once beautiful setup is now dark and dreary. That brings us to lighting.
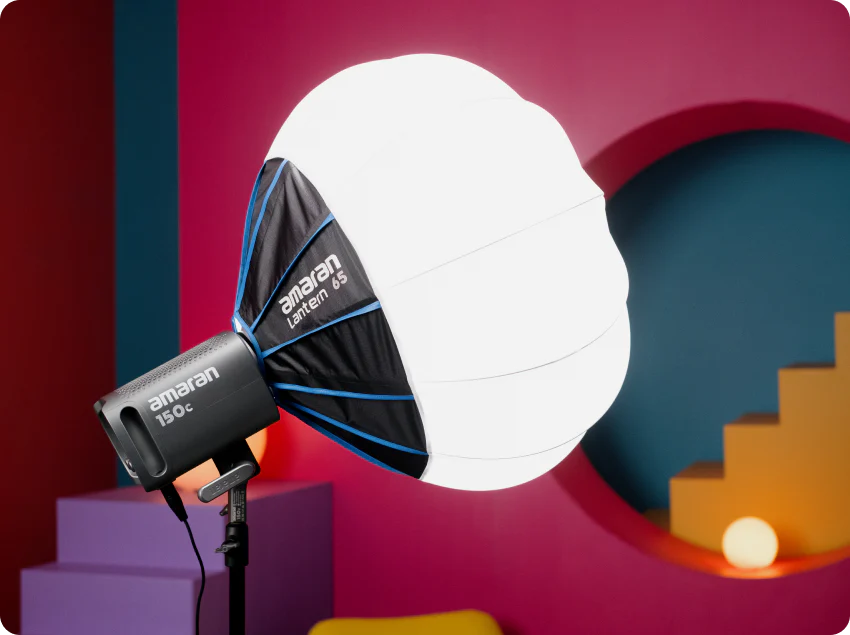
Simply Simple Lighting for a podcast/conversation style content uses 3 lights, yep, as simple as that. One key light that sits above the two talents in the center and uses a lantern attachment to soften the lighting, and two hair lights to add depth to the talents. Here are the best options on the market without breaking the bank:
Primary light/key light
- If you are in a darker room without sunlight or can control the sunlight use this one, the Amaran Halo 200x
- If you are in a room with lots of natural light, use this one Amaran Halo 600x.
Key light modifier
- The Amaran Lantern 65 Softbox will make the light a really natural feel on the faces of your talent, reducing shadows. Bigger and closer to talent = softer light with fewer shadows….smaller and further away = harsher light and more shadows.
Hair lights!!
- A simple light that not many people think about adding to the frame, but makes it look amazing. We are going for attention to detail and taking pages out of $million dollar product studios strategies to incredible frames. You don’t need much light power, you can use these Amaran Halo 60xs which are the same brand as the other lights above keeping them compatible with the same phone app to control them, or these Colbor W60 Video Lights if you want to save a little money. One light for each talent.
- Stands….!!!
You need the ability to mount these lights somewhere
- Key light stand, and fill up the sand bag with weight to counterbalance the light + modifier on the other end.
- Hair light stands, these are just fine, the hair lights don’t weigh very much.
Price?
- Key light + modifier + stand = $428 - $628
- Hair lights + stands = $200 - $270
Based on the preliminary 2 traits, here are the three kits at three price points I would recommend looking at.
Kit #1: Using What You Already Have + $250
If you are just starting out, do not drop thousands of dollars on cameras. The phones in your pocket (and your co-hosts’ pockets) are capable of incredible 4K video if you give them the right environment. This kit focuses entirely on nailing the first two traits, audio and light, while leveraging the camera sensors you already own.
- The Video: 3 × iPhones or Android phones (One for Host A, one for Host B, one for the wide master shot).
- The Audio: The Rode PodMic setup running into the Zoom H1 (~$560 total for mics, mixer, desk stands, and quality XLR cables).
- The Lighting: You will rely heavily on the Sunlight Mastery Hack you read about above. Set up your table or couch near a window with white see-through shades to act as a massive, free softbox. Use a household lamp in the background to add a pop of depth.
- The Workflow: Hit record on all three phones and the Zoom recorder. When you drop the footage into your editing software, use the “Sync by Audio” button. It will align your phone videos using the audio files.
- Drawbacks: You are at the mercy of the sun. If a cloud passes by mid-sentence, your video exposure will shift.
Kit #2a: Using APS-C Cameras - $2,000
- The Video: 3 × Sony ZV-1F or Used Sony ZV-1 cameras (~$469 each = $1,500). These cameras have sharp 1-inch or APS-C equivalent crop sensors, excellent real-time eye autofocus.
- The Audio: The Rode PodMic setup running into the Zoom H1 (~$560 total for mics, mixer, desk stands, and quality XLR cables).
- The Lighting: The 1-Light Studio Setup. A central Amaran COB light overhead with the Aputure Lantern modifier to throw an even, shadow-free glow on both faces. However, it does lack in creating more depth that a hair light on each talent would produce. (~$380 to $580 depending on how powerful a key light you need)
- The Workflow: Pop SD cards into all three cameras, hit record on everything, and sync the audio tracks in post-production. You get perfect 4K talking-head shots with very little cable clutter running across the floor to a central switcher.
- Drawbacks: The fixed wide lenses on budget vlogging cameras mean you can’t get tight, ultra-telephoto closeups with massive background blur.
Kit #2b: The Studio Efficiency Hack (Wireless Version) for $1,600
Let’s say you want those same clean camera angles and the professional 3-light studio look, but you want to save over $500 on the audio side and skip dealing with bulky XLR mixers altogether. This is the ultimate workflow hack.
- The Video & Lighting: Keep the exact same 3 × Sony ZV-1F cameras and the identical Amaran light setup from Kit #2a. Or upgrade the lighting with a 3 light kit from kit #3.
- The Audio: Ditch the three PodMics, the stands, the cables, and the Zoom mixer. Instead, you pick up a tiny, ultra-compact system like the Rode Mic Mini
- The Workflow: This is where it gets incredibly fast. You plug the tiny dual-channel Rode receiver directly into the 3.5mm microphone jack of your primary camera (Camera A). Clip the two miniature wireless transmitter badges onto your hosts. The audio routes wirelessly straight into Camera A’s video file, perfectly synced the moment you hit record. If you have a third speaker, you can run a cheap, standalone wired lav mic into Camera B.
- Why it rules: You save massive money and don’t have to carry a production bag full of heavy audio gear. Your entire multi-cam audio is backed up directly onto your video files, cutting your editing time in half.
- Drawbacks: Clip-on lapel mics capture great, clear speech, but they will never have that deep, rich, “radio broadcast” vocal tone that a dedicated desktop dynamic microphone gives you.
Kit #3: All Kitted Out for $3,000
This kit brings you into the professional league. It features larger sensor interchangeable lens cameras for a native cinematic look and a dedicated broadcast-grade production studio mixer that processes your audio live.
- The Video: 3 × Sony ZV-E10 mirrorless camera bodies (~$550 each = $1,650) paired with budget prime lenses or the standard 16–50mm kit lenses. The larger APS-C sensor gives you that beautiful, authentic background blur that makes video look expensive.
- The Audio: 3 × Rode PodMics mounted on premium desktop boom arms ($537) running into a RØDECaster Duo (~$483). The RodeCaster features built-in APHEX studio processing (compression, noise gates, and aural exciters), making your voices sound like a crisp, polished radio broadcast the moment you hit stop.
- The Lighting: The professional lighting kit remains identical to keep skin tones flawless. An overhead Amaran Halo 200x ($249) inside an Amaran Lantern Softbox ($79) suspended via a heavy-duty C-Stand with a counterweight sandbag ($180). Behind the subjects, two Amaran Halo 60x ($338) function as designated hair/rim lights on compact stands.
- The Workflow: You can control all your studio lights simultaneously from your phone using the Sidus Link app. You record high-bitrate 4K files onto the camera cards and a master multi-track audio file on the RodeCaster, then sync them instantly in your editor.
- Drawbacks: Post-production sorting takes a few extra minutes because you have to pull memory cards out of three separate cameras and an audio mixer after every episode.
Bonus Kit: Money Is No Object for $10,000
If you are building a commercial-grade network studio or a permanent installation for high-profile client productions, this setup is the ultimate flex. It completely bypasses the limitations of consumer mirrorless bodies, giving you native 10-bit cinema cameras, premium constant f/2.8 glass, and an integrated hardware switching ecosystem that outputs a finished multi-cam timeline instantly.
- The Video: 3 × Sony FX30 Cinema Cameras ($1,799 each = $5,397). Unlike standard consumer mirrorless options, the FX30 is a true Cinema Line camera with dual-native ISO (800/2500) for flawless low-light clarity, dual memory card slots, active internal cooling fans to permanently eliminate overheating.
- The Glass: 3 × Sigma 18–50mm f/2.8 DC DN ($549 each = $1,647). By opting for a constant f/2.8 aperture standard zoom, you get the flexibility to frame tight closeups or wide group shots without ever losing light or exposing your sensor when zooming. The f/2.8 glass combined with the large Super35 sensor delivers a sharp subject outline and a creamy background blur.
- The Audio: 3 × Shure SM7B ($399 each = $1,197) mounted on premium Røde PSA1+ Studio Boom Arms ($387). The SM7B is the undisputed king of vocal rich low-ends and handles room reflections beautifully.
- The Mixer & Power: RØDECaster Duo. Because the SM7B is a notoriously “gain-hungry” microphone, the Duo is required; its high-gain Revolution Preamps supply pristine power to the mics without needing inline Cloudlifters, while the onboard hardware APHEX processing polishes your audio in real-time.
- The Switcher & Workflow: 3 × high-quality 25ft HDMI cables run into a Blackmagic Design ATEM Mini Pro ISO ($495). This switcher handles the live broadcast stream but simultaneously records all 3 raw camera feeds and the multi-track audio directly to a single external SanDisk USB-C SSD. It automatically generates a DaVinci Resolve project file, meaning your podcast is completely cut, synced, and edited the absolute millisecond you press stop.
- The Lighting Pack: The professional lighting kit remains identical to keep skin tones flawless. An overhead Amaran Halo 200x ($249) inside an Amaran Lantern Softbox ($79) suspended via a heavy-duty C-Stand with a counterweight sandbag ($180). Behind the subjects, two Amaran Halo 60x ($338) function as designated hair/rim lights on compact stands.
- Total Estimated Kit Cost: ~$10,990
Benefits:
- Instant Turnover: The ATEM ISO workflow completely destroys the post-production bottleneck. You leave the studio with an instantly editable multi-cam file on a single hard drive.
- Zero Thermal Limits: The FX30 cinema bodies can record for 24 hours straight without a single stutter.
- Sidus Link App Integration: Adjust color temperature, key output, and hair light intensity across all fixtures straight from your phone.
Drawbacks:
- Cable Footprint: Running premium HDMI lines and XLRs just gets messy to put up and take down all of the time.
- Desktop Clutter: Big broadcast boom arms and SM7B microphones will obscure a portion of your talents’ faces on screen, requiring meticulous framing.
This piece is also published on Medium.
Join the free Jumpstart community and grab the extended GHL trial.
The full unbranded video library - 62 videos in one GHL install, plus the Jumpstart community.
Request your invite to my private GoHighLevel community
Over 1,700 agencies, beginners, and business owners sharing what actually works in GoHighLevel. Drop your email and I'll send your invite.